
Why you would use this feature
If you have to make store specific planograms that are built by bringing together other planograms, this feature will help you do that. This allows you to then maintain a smaller set of planograms but still create the store specific planograms that you need.Example:
-
You have 3 folders containing planograms as separate .psa files:
- Peanut Butter
- Jams and Jellies
- Honey
-
You create a template file configured to stitch these component planograms together by defining which components and in what order and create the full planograms. With just a few component planograms you are able to make several new planograms. For example:
- 4FT Basic Peanut Butter + 4FT Basic Jams and Jellies + 4FT Basic Honey
- 4FT Basic Honey + 4FT Basic Jams and Jellies + 4FT Basic Peanut Butter
- 4FT Specialty Jams and Jellies + 4FT Specialty Peanut Butter
Feature Options
Where is your planogram stitching template file?
The planogram stitching template file is what tells MissionControl how to assemble your component planograms into completed planograms. If you have already created a file that contains your component template information, you can select that file using … If you need to create a file containing your component planogram assignments, click on New Template… to create a copy of the template file you can use to designate your store/planogram assignments. Once you have created this file, you can reuse it for future runs of this feature.Create stitching template
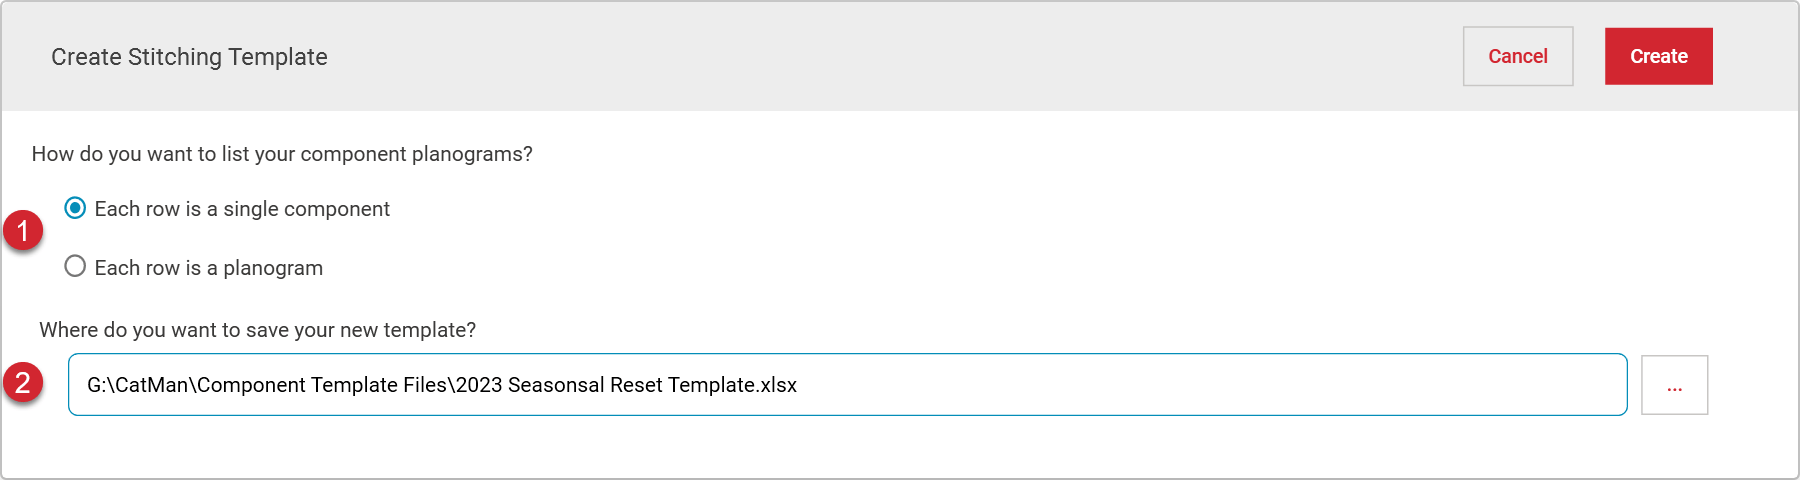

There are two options for how to list the component planograms to make the new planograms.
Select the option that is similar to how you have your information or the one that is easiest for you to work with. Ultimately, the planograms created by either option will be the same.

This is the location the template file will be copied to so you can adjust it. You can enter a location or, use the … button to browse for a location.
Once you have selected a location and clicked Save the template will be opened in Excel for you so you can configure it as needed.
Configure your template file
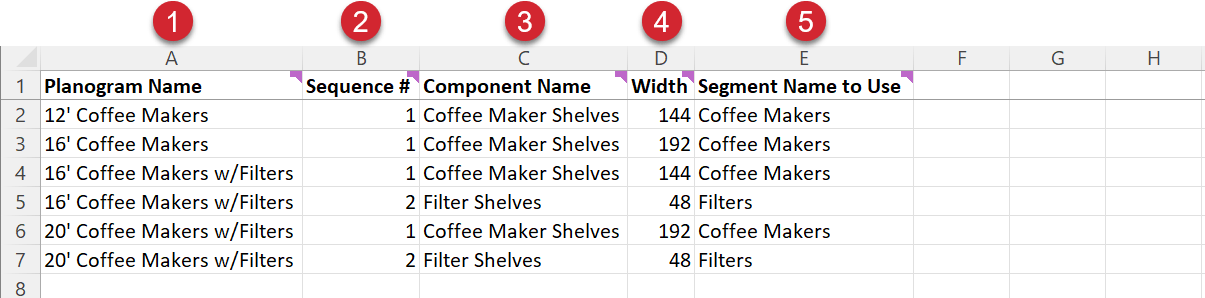
The template file (Excel or .csv) begins with a single row of header information, which is used to help you lay out your file but is ultimately ignored by MissionControl.Each row is a single component
| # | Description |
|---|---|
| Planogram Name contains the desired name of the Planogram to be built by that row of the Template file. MissionControl will match any rows with the same planogram name as a single planogram. |
| Sequence is used to order the components in the newly created planograms. Enter a sequence number and the components will be sorted in ascending order from left to right. |
 | Name of the component to be used. This component should have the same name as a PSA file in your component folder. |
 | Width this component should occupy in the final planogram. The component will be copied repeatedly until the width reaches or exceeds the width specified here. |
 | Segment name to use allows you to name the segments created when this component is added to your planogram. |
Each row is a planogram

| # | Description |
|---|---|
| Planogram Name contains the desired name of the Planogram to be built by that row of the Template file. |
| Name of the component to be used. This component should have the same name as a PSA file in your component folder. |
| Width this component should occupy in the final planogram. |
| Segment name to use allows you to name the segments created when this component is added to your planogram. |
| Repeat the component name, width, and segment name columns for each component you want included in the created planogram. |