
Fixture Allocation
The Fixture Allocation automation feature allows you to proportionally allocate shelves on your planograms based on a performance metric or formula you provide. Fixtures are allocated based on groups that you define using performance- or product-level attributes or formulas. For example, suppose you have a planogram that has products that belong to five categories and that you want to allocate the number of fixtures based on the share of unit movement for each category. For the sake of simplicity, we’ll say that there are 100 shelves in the planogram to be allocated. If the total movement of the products in the first category accounts for 18% of the movement, that category would get 18 of the 100 shelves. If the second category represented 22.6% of the movement, it would get 23 shelves (the number of shelves is rounded to the nearest whole number – partial shelf allocations are not supported). For each fixture group being allocated, you can specify the sequence in which the allocation occurs as well as the starting location within the planogram for the group.In order for the block placement rules and block adjustment rules to be configured, data needs to be loaded from a template planogram. The template planogram is only used for the configuration of the rules. Once the rules have been configured, they can be applied to any planograms and the template is no longer required.
Why you would use this feature
This feature is helpful when you need to pre-determine the number of fixtures to assign to specific product groups and to control the location and sequence of those groups. Other processes (such as automated planogram generation) can benefit from having these fixtures be designated by product group to simplify those processes.Feature Options
The main user interface for the Fixture Allocation automation is shown below. There are five main parts of the interface.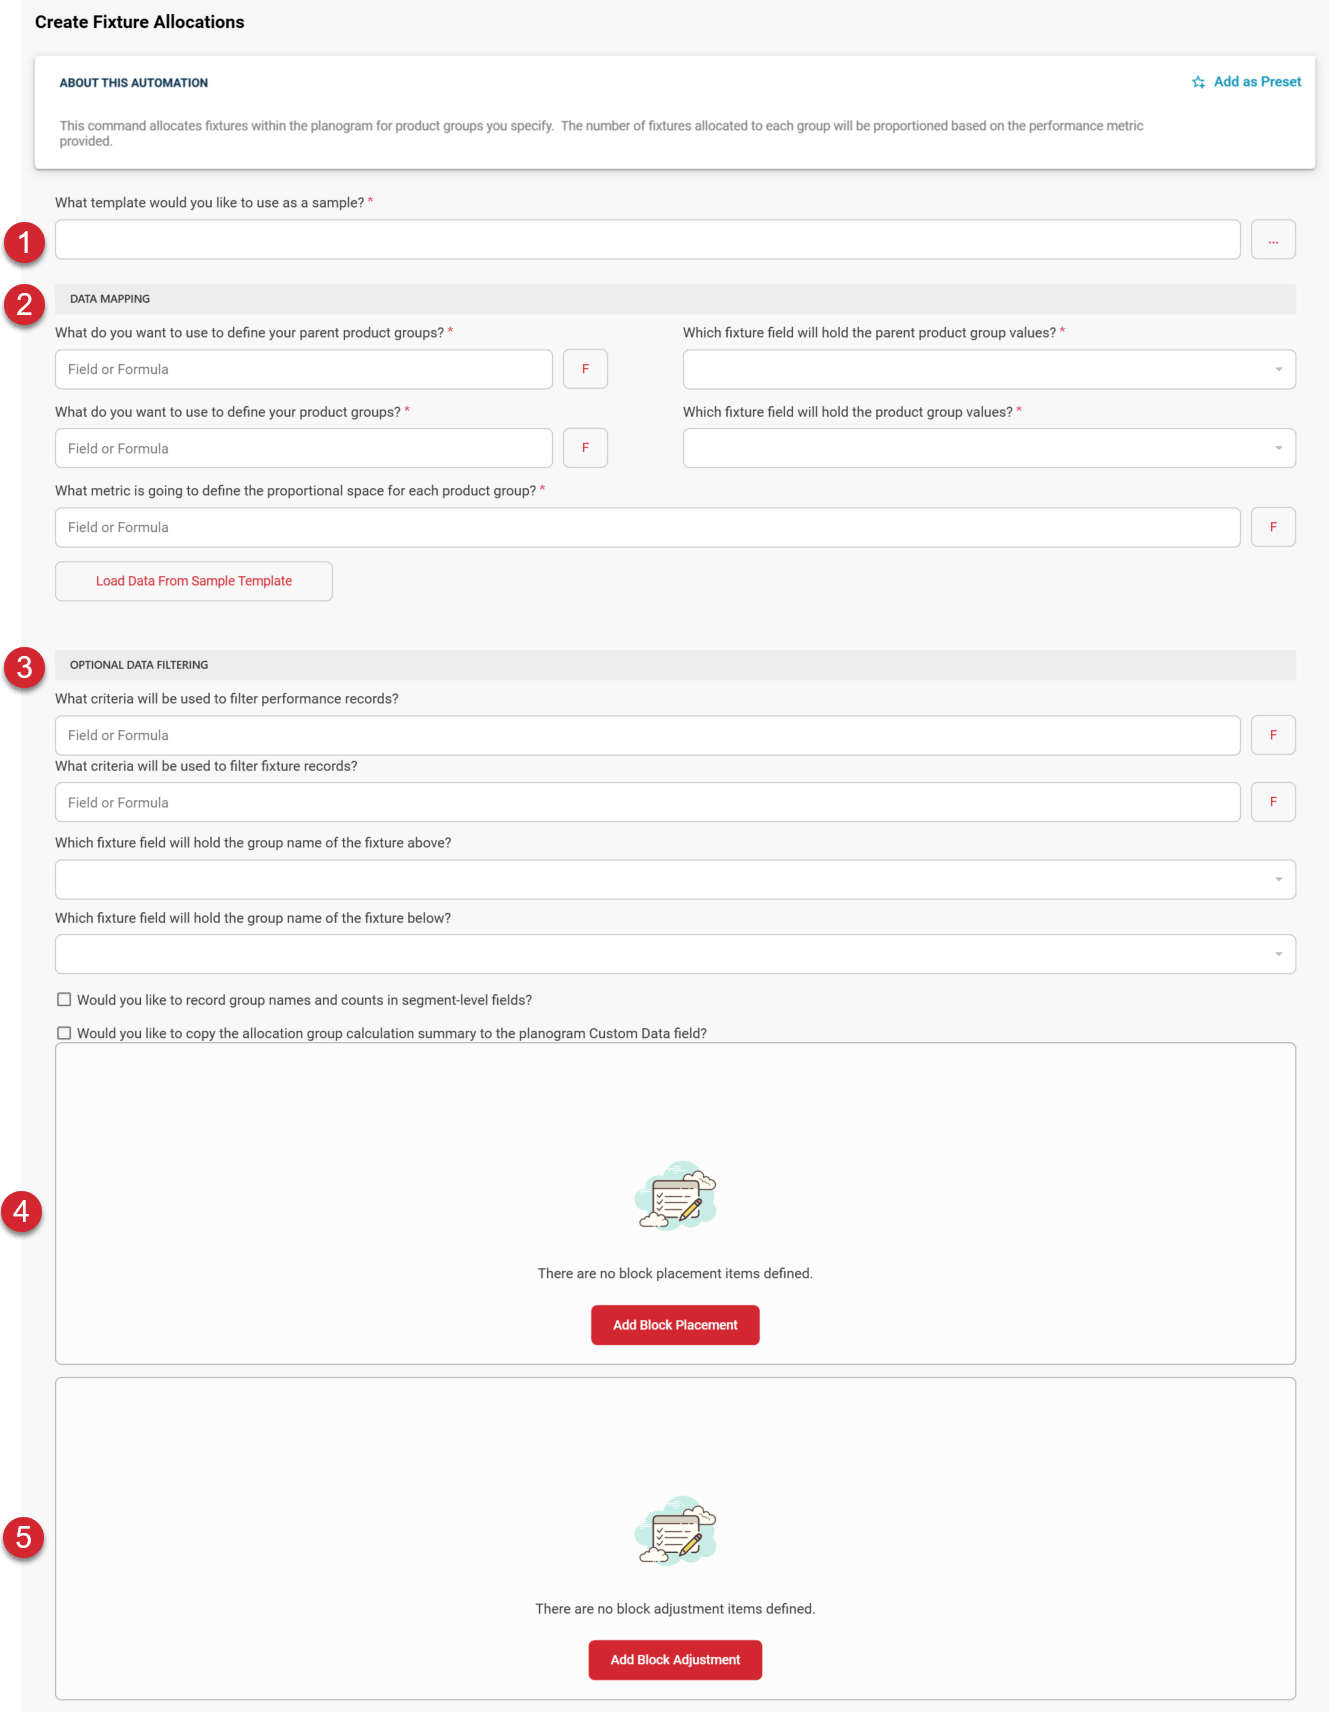

In order to define block placement and block adjustment rules, data needs to be loaded from a template planogram. The template planogram should have the product or performance attribute information that will be used to define each group for which fixtures are to be allocated. It does not matter whether the products are merchandised or if there are any fixtures on the template planogram.

In the Data Mapping section, you must specify the product- or performance-level attributes (or formulas) that will be used to define the parent product groups and the product groups to be allocated. The product groups will be the actual groups that fixtures will be allocated to. Parent product groups are used to identify a set of product groups to which block adjustment rules may be applied.
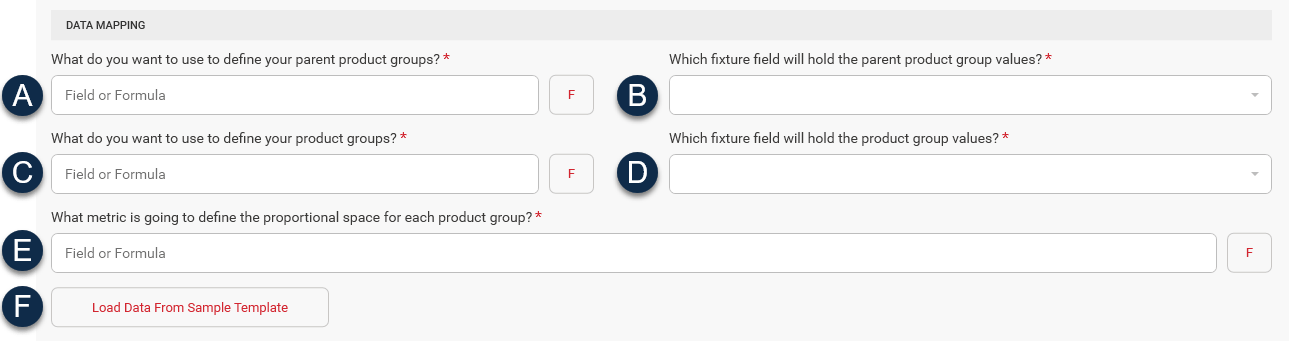

Parent product groups represent collections of product groups. For example, a parent product group might be a category of products and the product groups within the category might be made up of manufacturers within that category. In this case, the category field at the product level would be selected as the field to be used to define the parent product groups.
You can specify a field or formula to define what is to be used to define the parent product groups.

A fixture-level field needs to be selected to hold the parent product group name the fixture will be allocated to once the allocation process has been run. Any fixture-level descriptive field can be selected.

Product groups represent the groupings that fixtures will be allocated to. For example, if manufacturer is selected as the product grouping field, fixtures will be allocated to each manufacturer found.
You can specify a field or formula to define what is to be used to define the product groups.

A fixture-level field needs to be selected to hold the product group name the fixture will be allocated to once the allocation process has been run. Any fixture-level descriptive field can be selected.

A product- or performance-level field or formula must be defined and will be used to determine the proportional number of fixtures to be allocated for each group of products.

Once all of the fields or formulas have been specified within the Data Mapping section, you can click the Load Data from Sample Template button to load data from the template. This must be done before Block Placement Definitions or Block Adjustment Definitions can be created.

All of the settings in this section are optional.
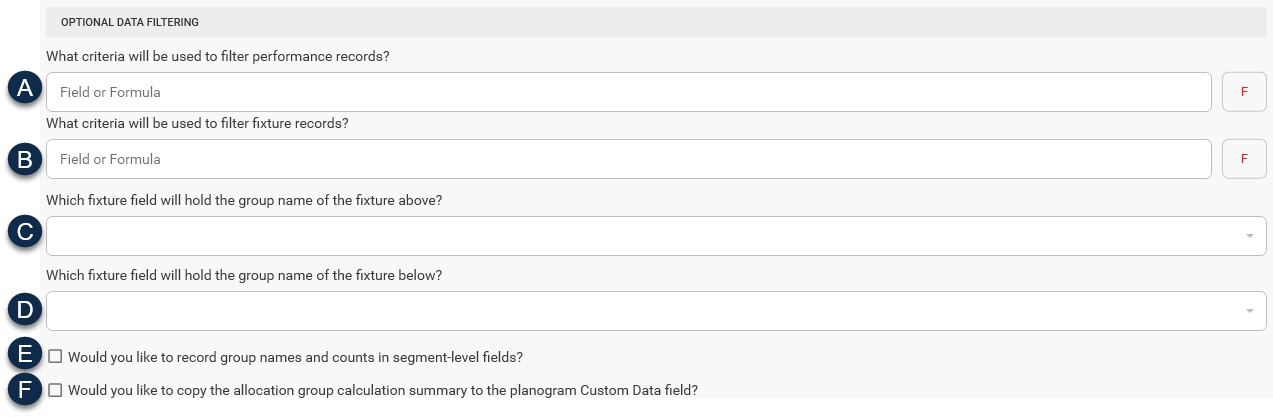
If you do not want to include all product or performance records to be used to determine what groups to allocate or what performance metric values to use, you can specify a formula to be used in selecting the records. Only records that match the formula value will be included.
If you do not want to allocate all shelves in your planogram, you can specify a filter to determine which fixtures are eligible for allocation.
Once the allocation process has been completed for a planogram, it may be helpful to know which allocation group was assigned to the fixture above the current fixture. This information can be recorded into the fixture field specified here.
Once the allocation process has been completed for a planogram, it may be helpful to know which allocation group was assigned to the fixture below the current fixture. This information can be recorded into the fixture field specified here.
If you would like to record the group names and fixture counts on a segment-by-segment basis, you can select a segment-level field to store this information into. Once the allocation process has been completed, the fixture groups and counts for each segment will be populated into the field you specify.
For the purposes of testing and validating the allocation results, you can have summarized allocation data recorded into the planogram-level Custom Data field. This data is recorded in HTML format, so it is most easily viewed by saving it as an HTML file and opening it in a browser.

To allocate fixtures, at least one Block Placement definition needs to be created. To add a block placement rule, click the Add Block Placement button.
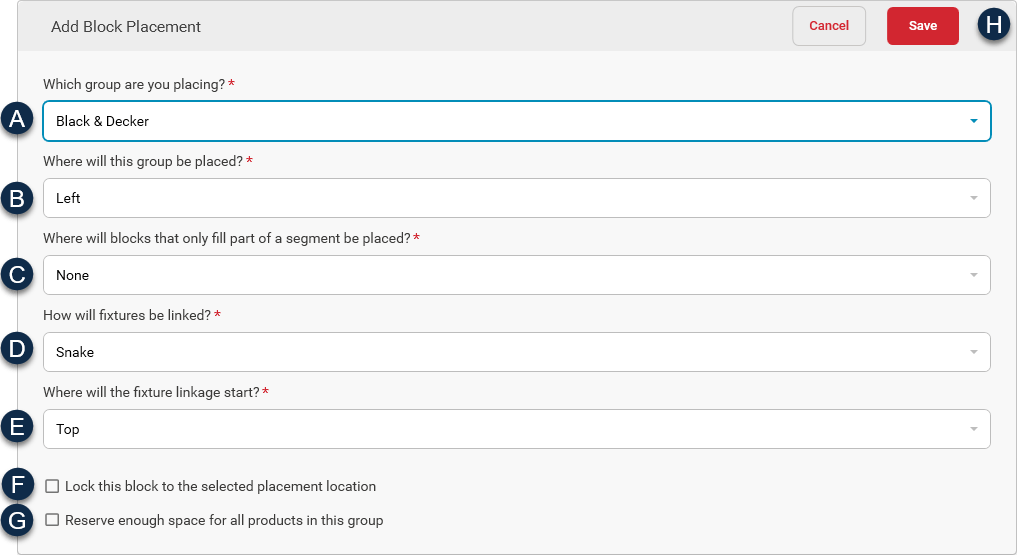
From the dropdown list, select the group that the placement rule will be used for. Only one block placement rule can be defined for each group, so once the group’s rule has been created, the group will no longer be shown in the dropdown list.
Note: If the dropdown list is empty, make sure a template has been selected and that the option for loading data from the template has been run.
Specify the location within the planogram that this group will be placed. Options are Top, Bottom, Left, or Right.
If a fixture block does not occupy all shelves within a segment, where should the block be placed within the segment? Options are None, Top, or Bottom. If None is selected, the fixture block will not be moved and will remain on the fixtures it was originally allocated to based on the linkage options. Otherwise, the block will be moved to the top or bottom of the segment based on the option selected.
Fixtures can be linked together using a snaking method or a library books method. In a snaking method, fixtures are linked sequentially within a segment before moving to the next segment.
If segment linkage is working from top to bottom on one segment, it will continue to the next segment working from bottom to top and vice versa.
If library book linkage is being used, shelves are linked across segments horizontally. When the end of the planogram is reached, linkage continues at the opposite end and continues in the same direction as those that have already been linked.
Fixture linkage can start at either the top or bottom of the planogram.
As blocks have been placed, subsequent blocks may cause the original block to be moved. For example, if the first block is placed at the top left corner of the planogram and then another block is also placed at the top left, the first block may be shifted downward and/or to the right to make room for the second block. If you want the first block to remain where it is and to not be shifted by any other blocks being placed, you can choose the option to lock this block to its placement location.

This option will attempt to reserve enough space for at least one facing (merchandised as units at a front orientation) of each product within the group on the fixtures being allocated.

Once the block placement rule has been defined, click Save to save the rule or Cancel to abandon the rule definition.

After product group blocks have been placed, it may be necessary to adjust the blocks contained within a parent group. For blocks that have been split between planogram segments, there are options to align or combine those blocks. Aligning the block portions will try to align the split pieces toward either the top or bottom of the segments. Combining the split blocks will attempt to combine the block pieces to eliminate the split.
To add a block adjustment rule, click Add Block Adjustment.
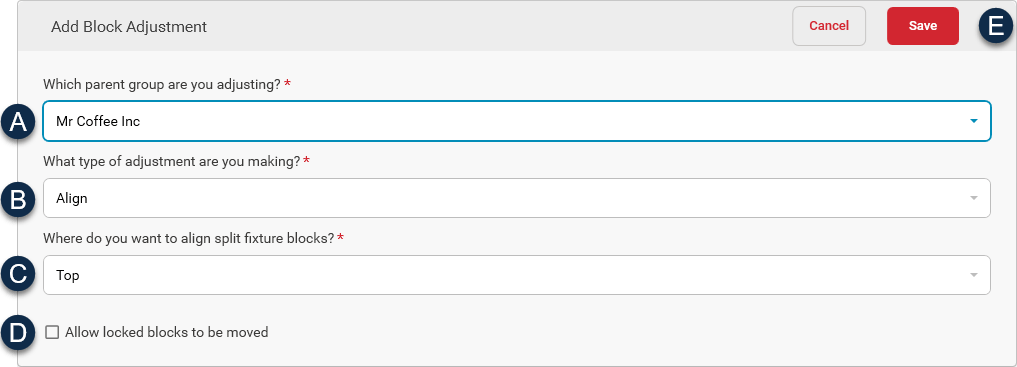
Block adjustment rules apply to blocks contained within a parent group. Select the parent group containing the blocks to be adjusted.
There are two types of adjustments that can be made to the blocks – blocks can be aligned or combined.
For fixture blocks that are split across multiple segments, you can choose to align the split blocks at the top or bottom of the planogram.
Blocks that have been locked by using the lock checkbox in the block placement rule for the block are not affected by any adjustment rules unless this option has been selected.
Once the block adjustment rule has been defined, click Save to save the rule or Cancel to abandon the rule definition.