> ## Documentation Index
> Fetch the complete documentation index at: https://docs.gocrisp.com/llms.txt
> Use this file to discover all available pages before exploring further.

# Planogram Upload

> Upload planograms and manage store assignments in Planogram Analytics.

This guide covers how to upload planograms and manage store assignments using the **Planogram Upload** tile in Planogram Analytics. Store assignment files can be included inside your planogram ZIP files or uploaded separately.

<Note>
  Before you upload, the [Space Planning Upload connector](/space-planning-ingestion/space-planning-upload-connector) must be configured. The connector controls how your uploaded files are interpreted (retailers, categorizations, planogram and store assignment mappings, and validation rules).
</Note>

## 1. Uploading planograms

<Steps>
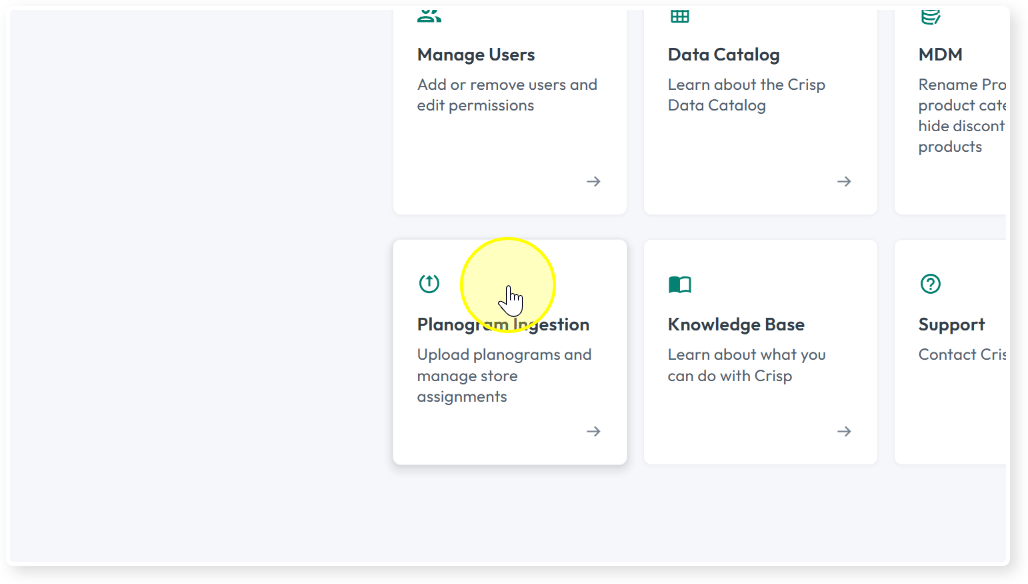
  <Step title="Navigate to Planogram Ingestion">
    From the Crisp home page, click **Planogram Ingestion**.
    <Frame>
      <img src="https://mintcdn.com/crispinc/LHuFGLTqGyDZaVR8/images/space-planning-ingestion/planogram-upload-01-navigate.png?fit=max&auto=format&n=LHuFGLTqGyDZaVR8&q=85&s=f6122ecdbaf0edfc421169c51f0c23aa" alt="Planogram Ingestion tile on the Crisp home page" width="1028" height="584" data-path="images/space-planning-ingestion/planogram-upload-01-navigate.png" />
    </Frame>
  </Step>

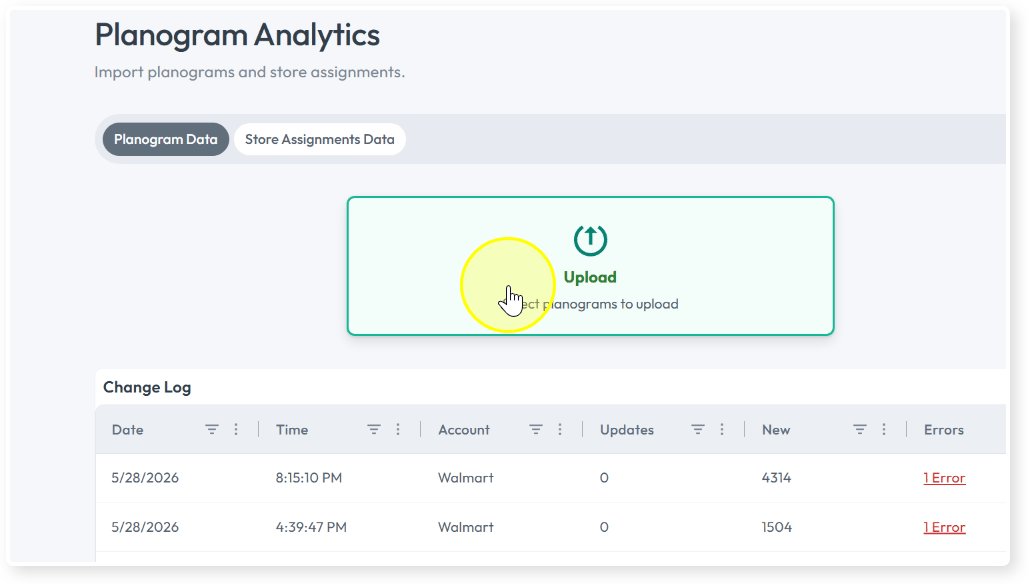
  <Step title="Click Upload">
    On the **Planogram Analytics** page, click the **Upload** tile.
    <Frame>
      <img src="https://mintcdn.com/crispinc/LHuFGLTqGyDZaVR8/images/space-planning-ingestion/planogram-upload-02-click-upload.png?fit=max&auto=format&n=LHuFGLTqGyDZaVR8&q=85&s=4ce2b3a6b933c83d1fd8139b2342081b" alt="Upload tile on the Planogram Analytics page" width="1028" height="584" data-path="images/space-planning-ingestion/planogram-upload-02-click-upload.png" />
    </Frame>
  </Step>

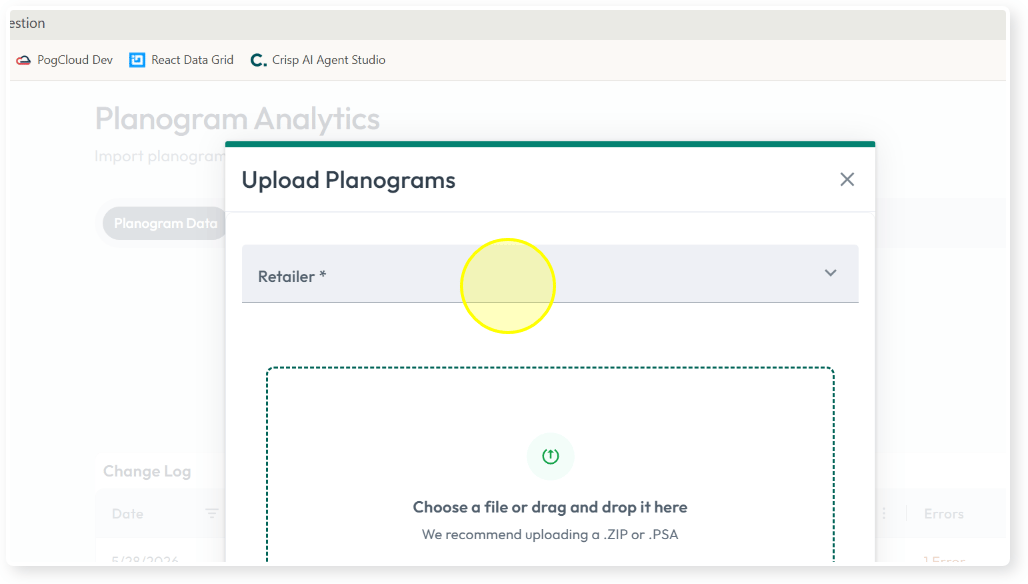
  <Step title="Select the Retailer">
    Choose the retailer that these planograms apply to.
    <Frame>
      <img src="https://mintcdn.com/crispinc/LHuFGLTqGyDZaVR8/images/space-planning-ingestion/planogram-upload-03-retailer.png?fit=max&auto=format&n=LHuFGLTqGyDZaVR8&q=85&s=83a1e1019bf54ebd978d14ba918bae64" alt="Retailer dropdown in the Upload Planograms dialog" width="1028" height="584" data-path="images/space-planning-ingestion/planogram-upload-03-retailer.png" />
    </Frame>
  </Step>

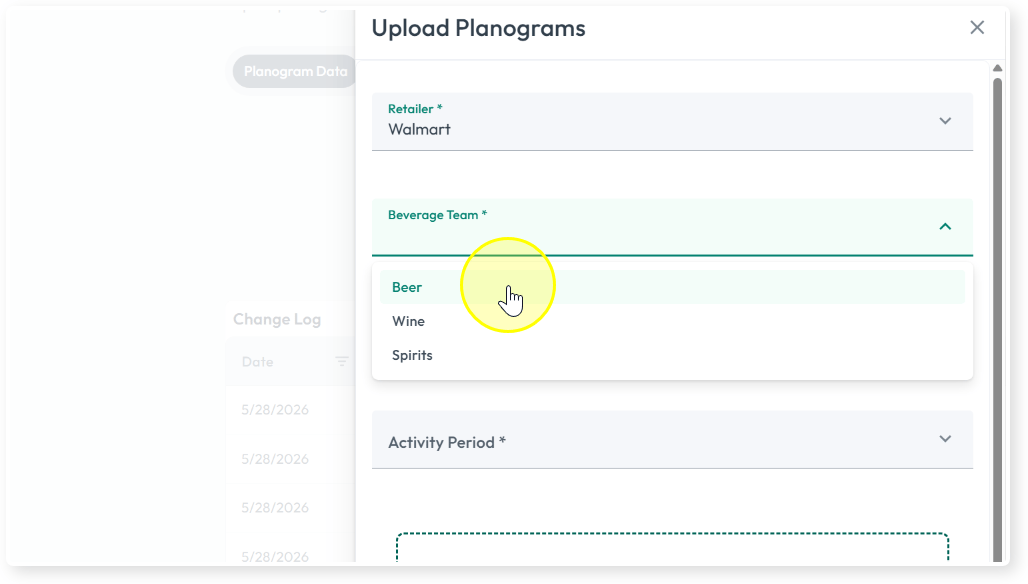
  <Step title="Select the Team">
    Choose the team (for example, Beverage Team → Beer).
    <Frame>
      <img src="https://mintcdn.com/crispinc/LHuFGLTqGyDZaVR8/images/space-planning-ingestion/planogram-upload-04-team.png?fit=max&auto=format&n=LHuFGLTqGyDZaVR8&q=85&s=8cedc8e61a6bd3fee458e0578abdf909" alt="Team dropdown showing Beer, Wine, Spirits options" width="1028" height="584" data-path="images/space-planning-ingestion/planogram-upload-04-team.png" />
    </Frame>
  </Step>

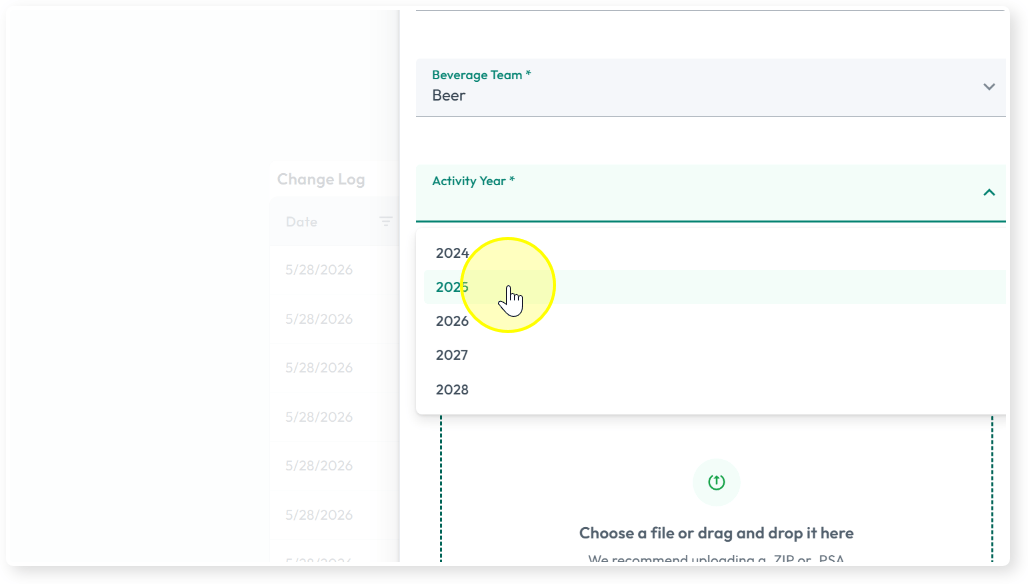
  <Step title="Select the Activity Year">
    Choose the year these planograms apply to.
    <Frame>
      <img src="https://mintcdn.com/crispinc/LHuFGLTqGyDZaVR8/images/space-planning-ingestion/planogram-upload-05-activity-year.png?fit=max&auto=format&n=LHuFGLTqGyDZaVR8&q=85&s=053e52fd46b91f6b308e3da58ac80dbe" alt="Activity Year dropdown" width="1028" height="584" data-path="images/space-planning-ingestion/planogram-upload-05-activity-year.png" />
    </Frame>
  </Step>

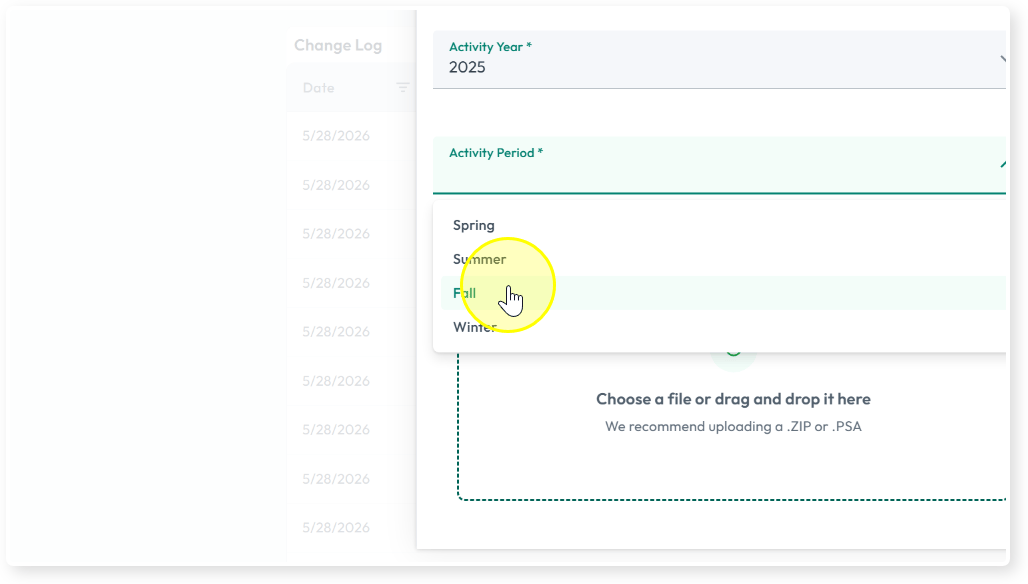
  <Step title="Select the Activity Period">
    Choose the period (Spring, Summer, Fall, or Winter).
    <Frame>
      <img src="https://mintcdn.com/crispinc/LHuFGLTqGyDZaVR8/images/space-planning-ingestion/planogram-upload-06-activity-period.png?fit=max&auto=format&n=LHuFGLTqGyDZaVR8&q=85&s=1e308d384f33f9c568aa6d397b61d1ba" alt="Activity Period dropdown" width="1028" height="584" data-path="images/space-planning-ingestion/planogram-upload-06-activity-period.png" />
    </Frame>
  </Step>

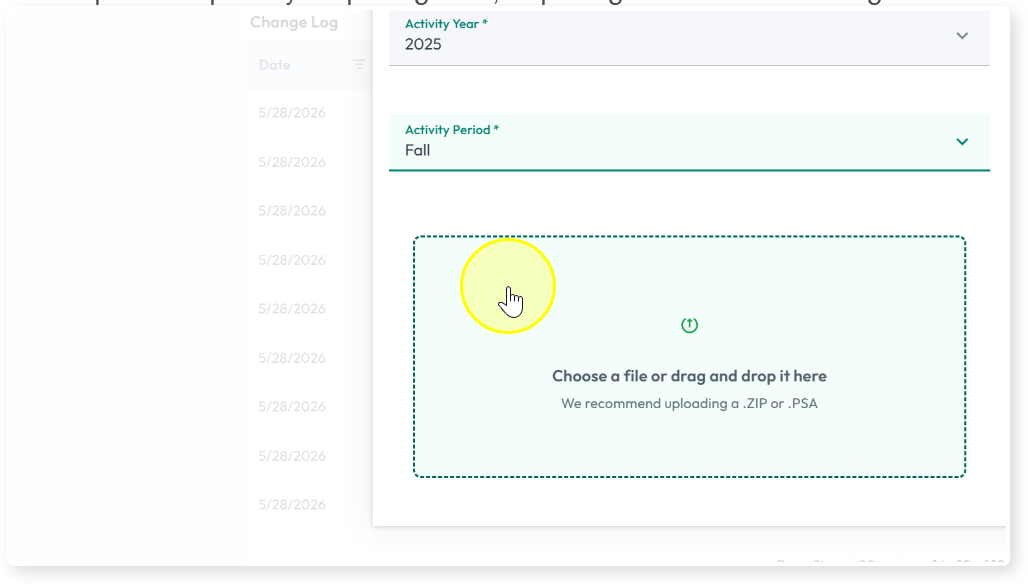
  <Step title="Add your file(s)">
    Click the upload area to browse, or drag and drop your ZIP files. You can upload planogram files only, or planogram files bundled with a store assignment file — see [Section 2](#2-including-store-assignments-in-a-planogram-upload).
    <Frame>
      <img src="https://mintcdn.com/crispinc/LHuFGLTqGyDZaVR8/images/space-planning-ingestion/planogram-upload-07-file-drop.png?fit=max&auto=format&n=LHuFGLTqGyDZaVR8&q=85&s=15246ad67ad8cd7841c6bfff331ceb1d" alt="File drop area in the Upload Planograms dialog" width="1028" height="584" data-path="images/space-planning-ingestion/planogram-upload-07-file-drop.png" />
    </Frame>
  </Step>

  <Step title="Submit">
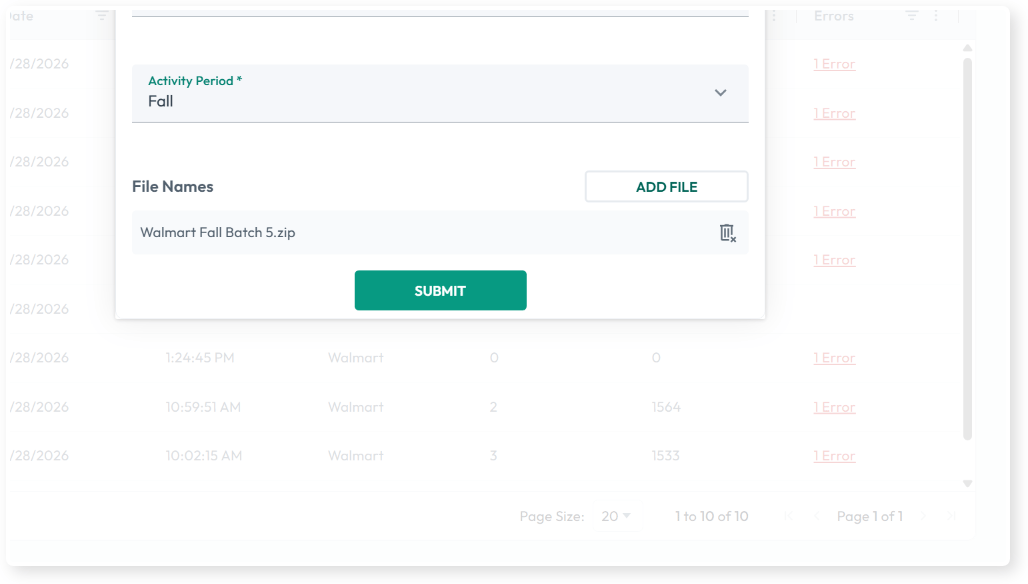
    Add any additional ZIP files if needed using **Add file**, then click **Submit**. The upload and transformation process will begin.
    <Frame>
      <img src="https://mintcdn.com/crispinc/LHuFGLTqGyDZaVR8/images/space-planning-ingestion/planogram-upload-08-submit.png?fit=max&auto=format&n=LHuFGLTqGyDZaVR8&q=85&s=f84aa89625f207fcfadf0a1218dfb801" alt="Submit button with ZIP file added" width="1028" height="584" data-path="images/space-planning-ingestion/planogram-upload-08-submit.png" />
    </Frame>
  </Step>

  <Step title="Confirm upload completed">
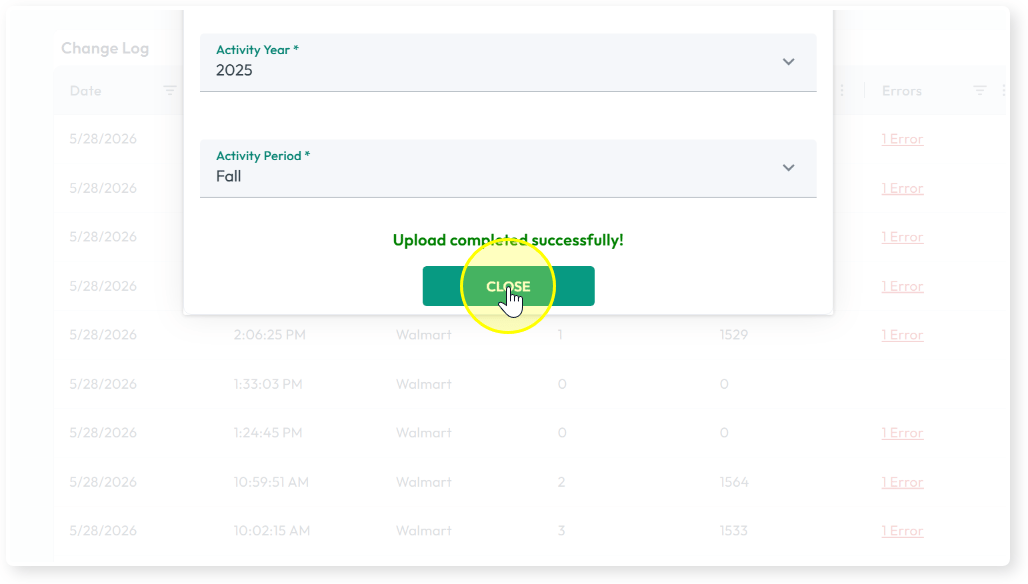
    When the upload finishes, you'll see **Upload completed successfully!** Click **Close**.
    <Frame>
      <img src="https://mintcdn.com/crispinc/LHuFGLTqGyDZaVR8/images/space-planning-ingestion/planogram-upload-09-success.png?fit=max&auto=format&n=LHuFGLTqGyDZaVR8&q=85&s=2a879994af8efdc7f72a68983177356b" alt="Upload completed successfully confirmation" width="1028" height="584" data-path="images/space-planning-ingestion/planogram-upload-09-success.png" />
    </Frame>
  </Step>
</Steps>

## 2. Including store assignments in a planogram upload

Store assignment files can be bundled inside your planogram ZIP files. Add a file named **`assignment.csv`** or **`assignment.xlsx`** to the ZIP before uploading.

<Warning>
  The file must be named exactly **`assignment.csv`** or **`assignment.xlsx`**. Files with any other name will not be recognized.
</Warning>

## 3. Managing store assignments

Store assignments can also be uploaded separately from planograms. Use the methods below depending on your workflow.

### 3a. Downloading existing assignments and the upload template

The downloaded file also serves as a template for preparing a new upload.

<Steps>
  <Step title="Open the Store Assignments Data tab">
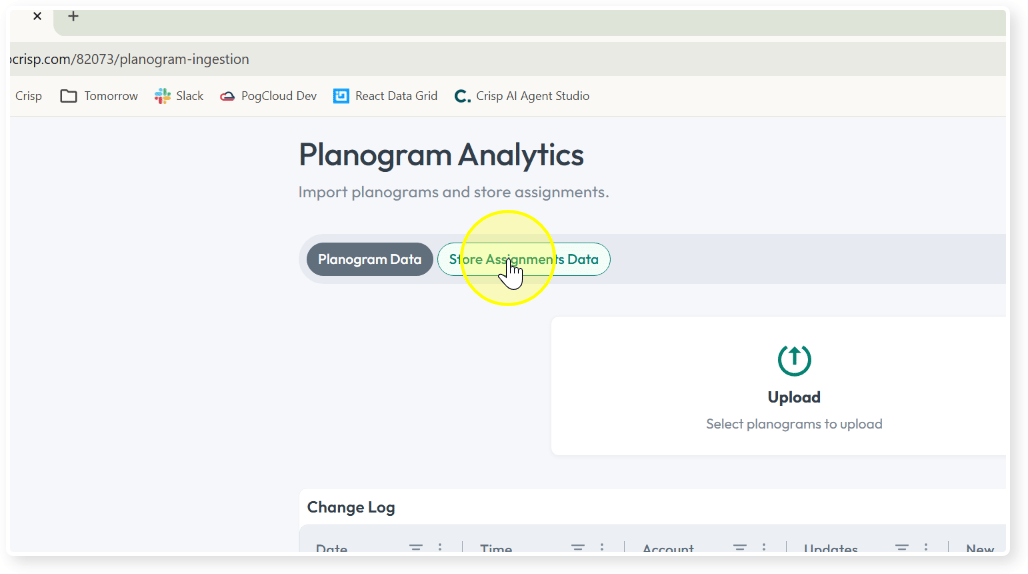
    On the **Planogram Analytics** page, click the **Store Assignments Data** tab.
    <Frame>
      <img src="https://mintcdn.com/crispinc/LHuFGLTqGyDZaVR8/images/space-planning-ingestion/store-assignments-download-01-tab.png?fit=max&auto=format&n=LHuFGLTqGyDZaVR8&q=85&s=c76b03d49baf85a0d82dce0a8eefd55e" alt="Store Assignments Data tab on Planogram Analytics" width="1028" height="574" data-path="images/space-planning-ingestion/store-assignments-download-01-tab.png" />
    </Frame>
  </Step>

  <Step title="Click Download">
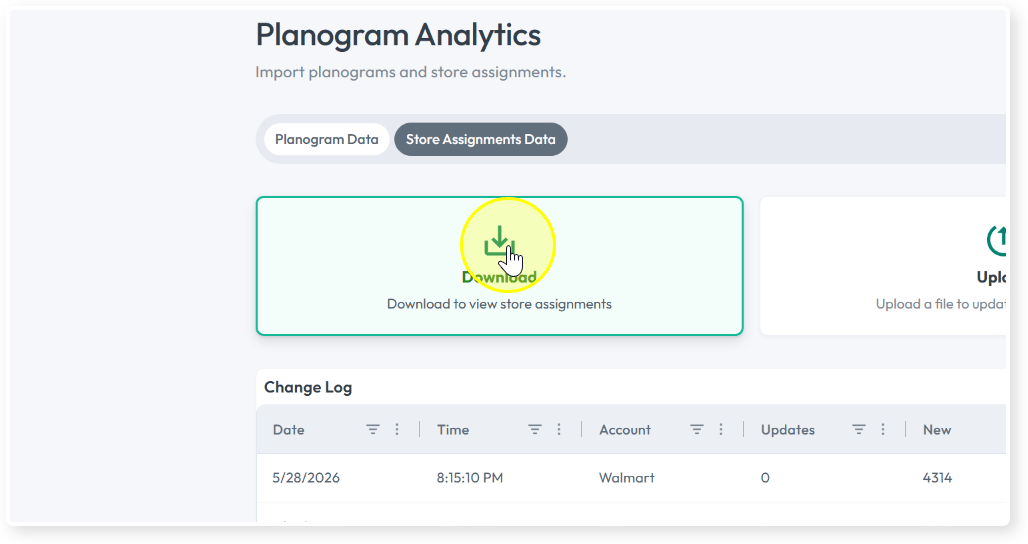
    Click the **Download** tile to export your existing store assignments. Review or modify the file to prepare it for upload.
    <Frame>
      <img src="https://mintcdn.com/crispinc/LHuFGLTqGyDZaVR8/images/space-planning-ingestion/store-assignments-download-02-download.png?fit=max&auto=format&n=LHuFGLTqGyDZaVR8&q=85&s=d3009658120f9d45d7d860a9a346bfa0" alt="Download tile on Store Assignments Data" width="1028" height="544" data-path="images/space-planning-ingestion/store-assignments-download-02-download.png" />
    </Frame>
  </Step>
</Steps>

### 3b. Uploading store assignments

<Steps>
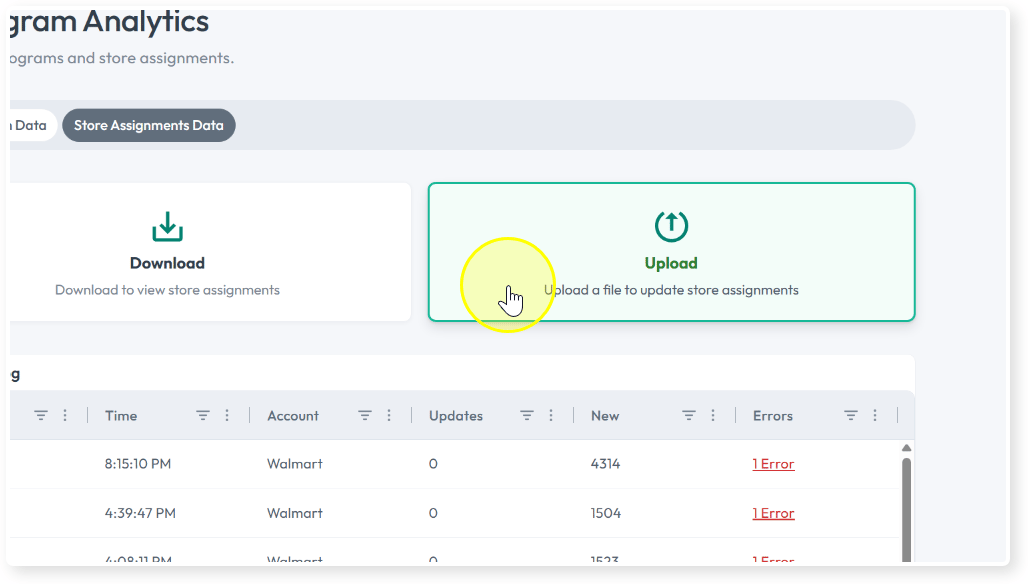
  <Step title="Click Upload">
    On the **Store Assignments Data** tab, click the **Upload** tile.
    <Frame>
      <img src="https://mintcdn.com/crispinc/LHuFGLTqGyDZaVR8/images/space-planning-ingestion/store-assignment-upload-01-upload-tile.png?fit=max&auto=format&n=LHuFGLTqGyDZaVR8&q=85&s=81327cb821c524d8c255e7708d5ed419" alt="Upload tile on Store Assignments Data" width="1028" height="584" data-path="images/space-planning-ingestion/store-assignment-upload-01-upload-tile.png" />
    </Frame>
  </Step>

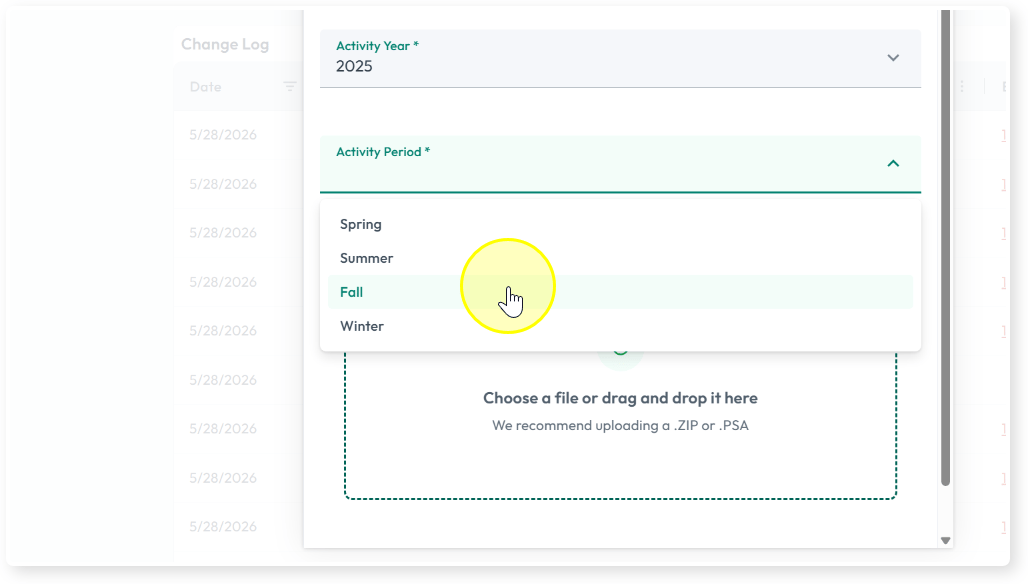
  <Step title="Select the Activity Period">
    Choose the activity period for the upload.
    <Frame>
      <img src="https://mintcdn.com/crispinc/LHuFGLTqGyDZaVR8/images/space-planning-ingestion/store-assignment-upload-02-period.png?fit=max&auto=format&n=LHuFGLTqGyDZaVR8&q=85&s=72a1daac5919d1f9c191f78ca31ddd2a" alt="Activity Period dropdown in the store assignments upload dialog" width="1028" height="584" data-path="images/space-planning-ingestion/store-assignment-upload-02-period.png" />
    </Frame>
  </Step>

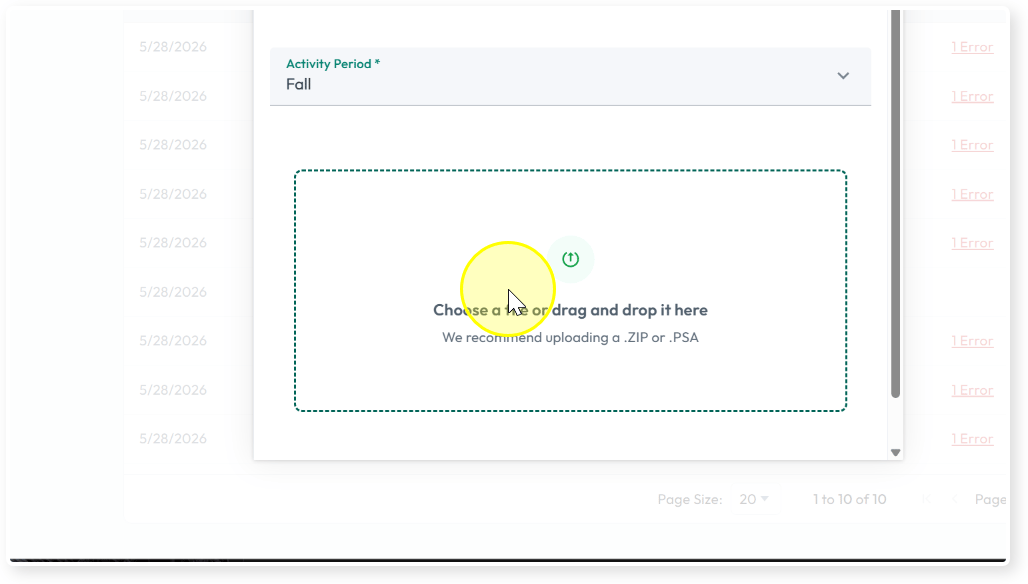
  <Step title="Add your file">
    Click to browse, or drag your **`assignment.csv`** or **`assignment.xlsx`** file into the upload area.
    <Frame>
      <img src="https://mintcdn.com/crispinc/LHuFGLTqGyDZaVR8/images/space-planning-ingestion/store-assignment-upload-03-file-drop.png?fit=max&auto=format&n=LHuFGLTqGyDZaVR8&q=85&s=e4d4e6a0b43576742e0620a3ac63e854" alt="File drop area for store assignment upload" width="1028" height="584" data-path="images/space-planning-ingestion/store-assignment-upload-03-file-drop.png" />
    </Frame>
  </Step>

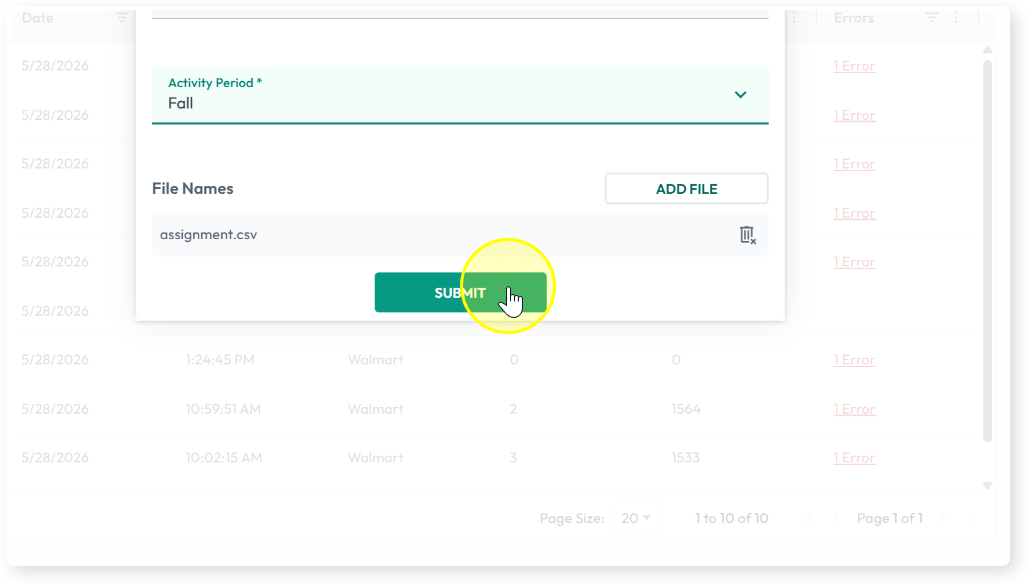
  <Step title="Submit">
    Click **Submit** to start the upload.

    <Frame>
      <img src="https://mintcdn.com/crispinc/LHuFGLTqGyDZaVR8/images/space-planning-ingestion/store-assignment-upload-04-submit.png?fit=max&auto=format&n=LHuFGLTqGyDZaVR8&q=85&s=661919ec119af3e3035a5c87134ae073" alt="Submit button with assignment.csv added" width="1028" height="584" data-path="images/space-planning-ingestion/store-assignment-upload-04-submit.png" />
    </Frame>
  </Step>
</Steps>

### 3c. Uploading stores via MDM

Use this option to update the underlying store list in **AI Master Data**.

<Steps>
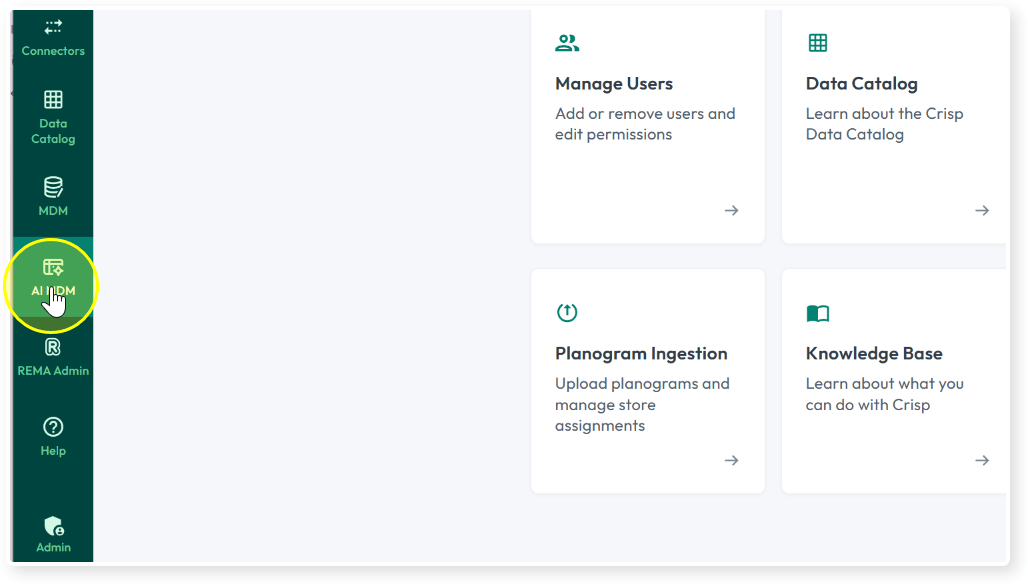
  <Step title="Navigate to AI MDM">
    From the left navigation, click **AI MDM**.
    <Frame>
      <img src="https://mintcdn.com/crispinc/LHuFGLTqGyDZaVR8/images/space-planning-ingestion/mdm-upload-01-navigate.png?fit=max&auto=format&n=LHuFGLTqGyDZaVR8&q=85&s=051af212719db23b636e852c3eabe885" alt="AI MDM in the left navigation" width="1028" height="584" data-path="images/space-planning-ingestion/mdm-upload-01-navigate.png" />
    </Frame>
  </Step>

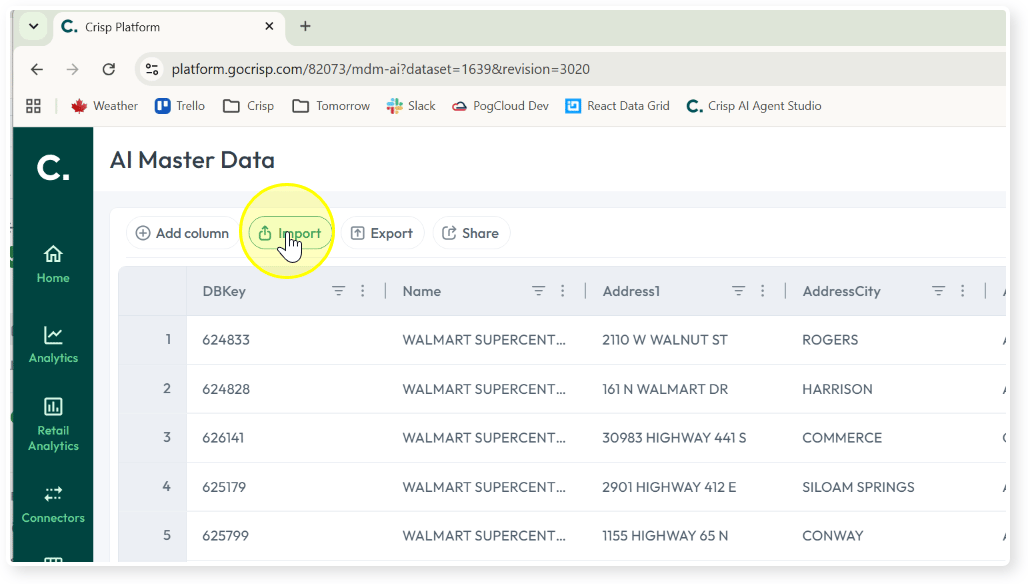
  <Step title="Click Import">
    On the **AI Master Data** page, click **Import**.
    <Frame>
      <img src="https://mintcdn.com/crispinc/LHuFGLTqGyDZaVR8/images/space-planning-ingestion/mdm-upload-02-import.png?fit=max&auto=format&n=LHuFGLTqGyDZaVR8&q=85&s=b0b21a344ae4e841dc319cf9facc2b7f" alt="Import button on AI Master Data" width="1028" height="584" data-path="images/space-planning-ingestion/mdm-upload-02-import.png" />
    </Frame>
  </Step>

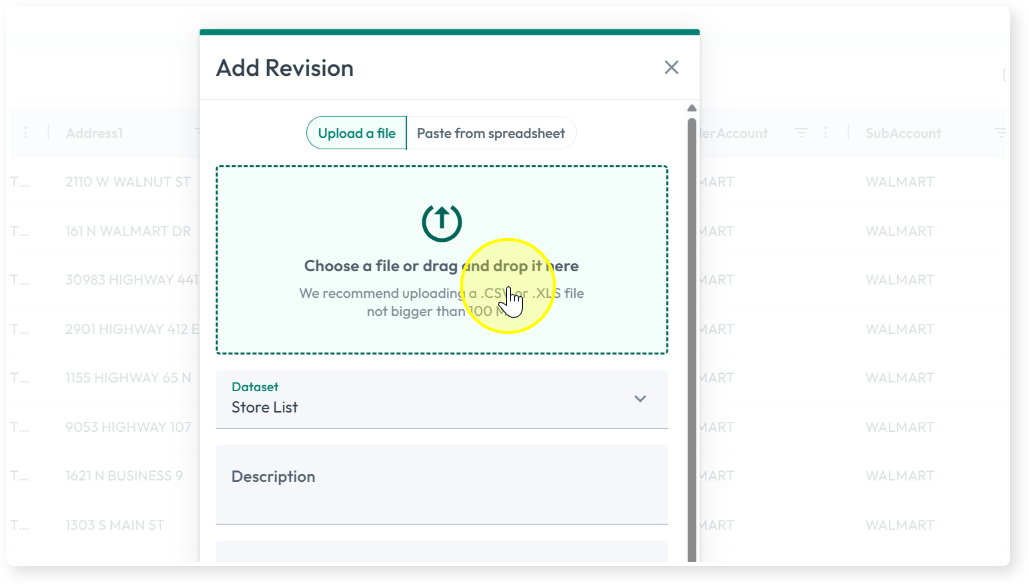
  <Step title="Choose your file">
    In the **Add Revision** dialog, upload a **`.CSV`** or **`.XLS`** file containing your store assignments.
    <Frame>
      <img src="https://mintcdn.com/crispinc/LHuFGLTqGyDZaVR8/images/space-planning-ingestion/mdm-upload-03-choose-file.png?fit=max&auto=format&n=LHuFGLTqGyDZaVR8&q=85&s=dc035bbab7f91d619193fd5fa6d1f359" alt="Add Revision dialog with file picker" width="1028" height="584" data-path="images/space-planning-ingestion/mdm-upload-03-choose-file.png" />
    </Frame>
  </Step>

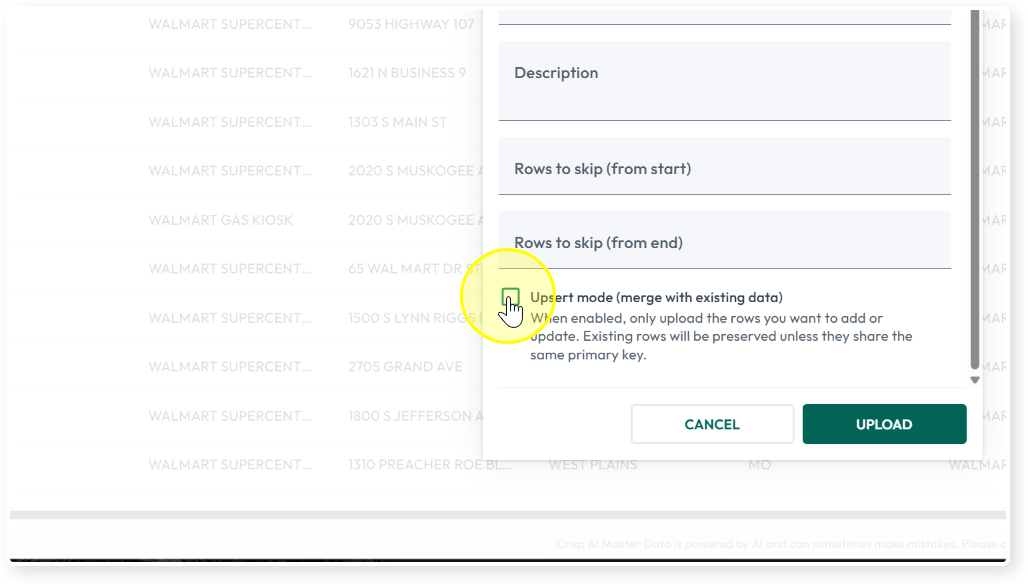
  <Step title="Enable Upsert mode">
    Select **Upsert mode** to update existing records and add any new ones. Existing rows are preserved unless they share the same primary key.
    <Frame>
      <img src="https://mintcdn.com/crispinc/LHuFGLTqGyDZaVR8/images/space-planning-ingestion/mdm-upload-04-upsert.png?fit=max&auto=format&n=LHuFGLTqGyDZaVR8&q=85&s=3158be793e524a162fc767f072fb366f" alt="Upsert mode checkbox enabled" width="1028" height="584" data-path="images/space-planning-ingestion/mdm-upload-04-upsert.png" />
    </Frame>
  </Step>

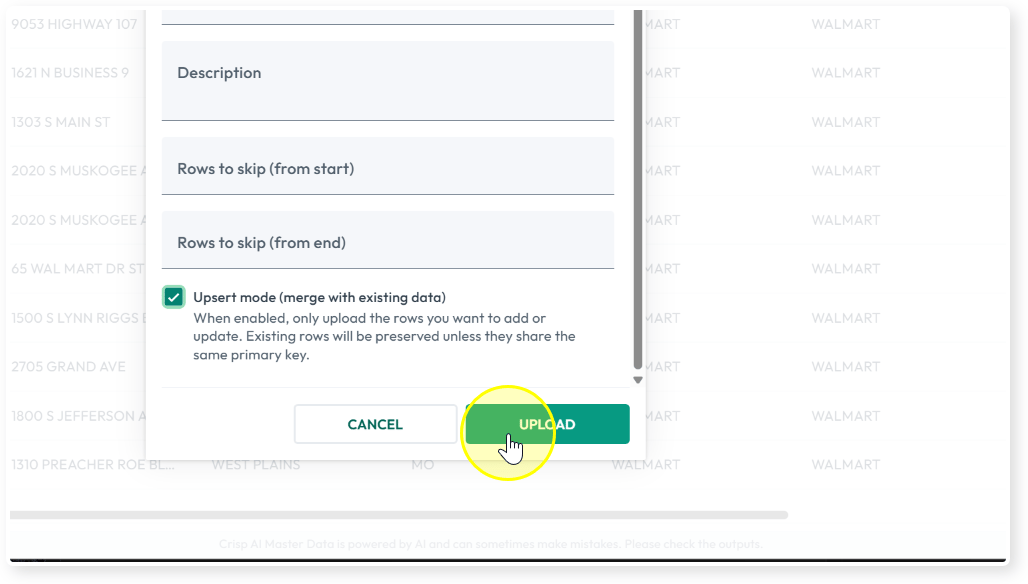
  <Step title="Click Upload">
    Click **Upload** to apply the changes.
    <Frame>
      <img src="https://mintcdn.com/crispinc/LHuFGLTqGyDZaVR8/images/space-planning-ingestion/mdm-upload-05-upload.png?fit=max&auto=format&n=LHuFGLTqGyDZaVR8&q=85&s=0e13c1c4c73def8cf69270b71db2434c" alt="Upload button in the Add Revision dialog" width="1028" height="584" data-path="images/space-planning-ingestion/mdm-upload-05-upload.png" />
    </Frame>
  </Step>
</Steps>

## Related

<Card title="Space Planning Upload connector" icon="plug" href="/space-planning-ingestion/space-planning-upload-connector">
  Configure how planogram and assignment files are interpreted when uploaded.
</Card>